How to Easily Compare Two Excel Files to Spot Changes
Whether you’re managing a product list, tracking orders, or reviewing performance data, there’s one task we all face at some point: comparing two versions of an Excel file.
It sounds simple at first—until you have hundreds or thousands of rows, and you’re not sure what’s new, what’s changed, or what’s missing. The good news? With a few Excel tricks, you can spot changes like a pro—without spending hours scanning line by line.
In this blog, let’s explore a simple, repeatable way to compare two Excel sheets, using a real-world-inspired example and plain language.
Why You Might Need to Compare Excel Files
Imagine these everyday scenarios:
- You run a small online store, and every few days you export your product catalog from your website. You want to know if any prices changed or new products were added.
- You’re in HR, and you have a list of employee records from last month and this month. You need to know who joined, who left, or whose details have changed.
- You’re in finance, and someone just sent you a new spreadsheet. But… you don’t know what’s different from the last one!
Sound familiar? These are the kinds of situations where comparing Excel files can save time, reduce mistakes, and keep you in control.
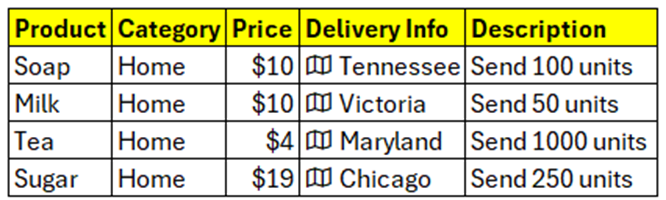
The Setup: Two Versions of the Same Table
Let’s say you have two Excel files:
- File 1 (Old Data) – This is your earlier export (say, from last week).
- File 2 (New Data) – This is today’s updated version.
They look something like this
Step-by-Step: How to Compare Two Excel Files
- Create a Unique Identifier for Each Row
We start by making sure we can match rows correctly. Sometimes product names or IDs change slightly, so the safest bet is to create a unique key by combining values from a few columns that don’t change often. In a new column (let’s call it UniqueKey), use a formula like:
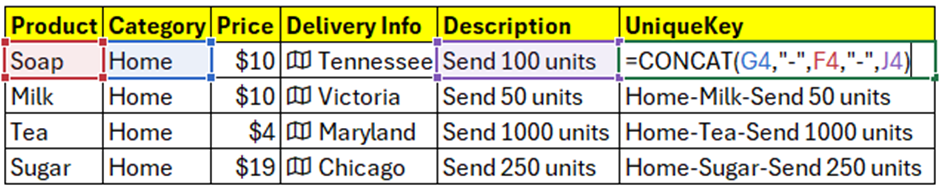
Do this in both files (File 1 and File 2).
- Check for New or Missing Rows
Now let’s find out which rows in File 2 are not in File 1 (i.e., new additions).
In File 2, next to your UniqueKey column, write:
=IF(ISNA(VLOOKUP(K4,[File1]Sheet1!$F$1:$F$5,1,0)), "New Row", "")
we’ll call this column LOOKUP. It should look like this in Excel

K4 = UniqueKey column value
[File1]Sheet1!$F$1:$F$5 = table array, you’re looking up K4 in (read as File 1>Sheet1>Cell F1 to F5 in absolute reference; way of telling EXCEL to NOT change the reference when you Duplicate the formula in K5)
This formula will print “New Row” if it finds NEW ROW in File 1, else it’ll print NOTHING
- Compare Specific Fields Like Price or Delivery
Let’s say the product is already there, but you want to know if the price changed.
You can use a formula like this in File 2:
=IF(VLOOKUP(K4,[File1]Sheet1!$A$1:$F$5,3,0)<>K4, "Price Changed", "")
(Tip: Adjust the column index 3 to point to the Price column in File 1.)
Repeat this idea for other fields in your data.
Make It Repeatable
If you’re doing this often (weekly or daily exports), create a template sheet with all the formulas already set up. Just paste in the new data, and Excel will do the work for you.
Final Thoughts
You don’t need to be an Excel wizard to track changes between two files. With just a few helper columns and some basic functions like VLOOKUP or IF, you can get answers fast:
- What’s new?
- What changed?
- What’s missing?
This trick is a lifesaver for e-commerce sellers, HR teams, analysts, and anyone dealing with data snapshots over time.